

trueSpace is a 3D modeling and animation software for Windows that lets you create realistic 3D scenes from scratch, walk-throughs, games, etc. You can also import characters created in other software like AutoCAD, 3ds Max, Adobe Illustrator, etc.
trueSpace used to sell for $600 but then Microsoft acquired the company and released trueSpace as a free download probably in response to SketchUp that’s owned by Google.

The idea is to let users create building and landscapes for Virtual Earth just like one can use SketchUp to create 3D models for Google Earth (SketchUp review).
If you are from the education community, you’ll especially love trueSpace for simulations.
Like with any other 3D authoring software, there’s a steep learning curve involved with trueSpace but if you are looking for a good alternative to 3DS Max or Blender, Microsoft trueSpace is available at a price that may be hard to beat.
Thursday, July 24, 2008
 Free Alternative to 3ds Max, Google Sketchup - Microsoft trueSpace

Monday, July 14, 2008
Microsoft Word Tip : Long Documents

This tip will come very handy if you are editing a document inside Microsoft Word that spans more than a couple of pages.
Say you are writing something on Page 9 of a Word document and then scroll down to some place on Page 16. Now if you were to go back to the previous location on Page 9, just press Shift + F5.
Microsoft Word remembers the last location of your cursor on the document just like the Back and Forward arrows in a web browser. And to go back to Page 16, press Shift+F5 again. Source: MS newsletter.
Tuesday, July 08, 2008
Measure it in Live Maps
This post by Greg Sterling this AM is a good reminder to tell you about one of my favorite features on Live Maps – Distance and Area calculations. If you ever wanted to know how far it is between 2 cities or what the area of the surface of a given lake is, Live Maps drawing tools make it really easy.
Even without drawing you can calculate directions to get the approximate drive time and distance between any 2 points by right clicking and choosing ‘Drive From…’ and ‘Drive to…’. Live maps has intercity vector map data for just about everywhere on Earth, including places it doesn’t have detailed city streets for.
But you can tailor the trail by using the Collections –> Open Your Collections menu to draw your own lines or shapes. Whether it is a simple 2 point line or a complex closed polygon, Live Maps will show you the distance and area/perimeter respectively. Here is Greg’s ‘Crow Flies’ distance from Haifa to Sfat.
And here is a Polygon drawn around the nearby Sea of Galilee showing that it is 63.33 Square Miles. If you sign in with your Live ID you can save your drawings in the cloud making them easy to share with others without the need for really long URL’s.
Saturday, June 28, 2008
Goodbye, Bill Gates!
Today is Bill Gates’ last day at Microsoft as a full-time employee. Goodbye and good luck.


Friday, June 20, 2008
Microsoft Surface secrets - you’ll wish you were here

There were still a few surprises up Microsoft’s sleeve today at this little conference I’m at. They’re talking about the SDK, testing the surface with robotic arms, and they demoed some totally freaking awesome apps they’ve got running in launch or alpha state. Believe me, you do wish you were here. Lots more pictures inside.


First, we saw a really nice photo app that’s going to be shipping with the units. It’s actually not that hard to set up, apparently — we had a developer show us how to throw together a pretty complex photo-and-tag-viewing program for the Surface in just a few minutes. The SDK is pumped up with all kinds of shortcuts and things that allow developers to take advantage of, say, the ability to slide an object around and have it stop based on friction or what objects it hits. This is great for the photo app, where you can move photos in and out of a little bubble or bar and toss them back in easily. Sorting and stacking the pictures felt very natural, like just sorting your usual 3×5s, except in this case some were videos, some you could expand to enormous size, and you could organize them automatically by metadata, category, and so on.


Next we saw probably one of the coolest things I’ve seen in a while. Essentially a geotagged photos viewing application, it had Virtual Earth (very fun to play with, as I did without permission for a bit) and spread across the world were little photos. The photos were placed on the map exactly where they were taken and they could be selected by hand gestures, or filtered by other means so that only, say, panoramic photos taken in 2007 would show up. I know I have a lot of those. Geotagging has always been kind of “meh” for me, but this made it accessible, purposeful, and entertaining. And it was something a developer had been working on in his spare time.


They then took us down to the labs, where we got to see how they stress-test these mothers. After all, there are so many freaky combinations of touches, drags, and rotations that when combined with all the stuff they’re trying to make instantly accessible, bugs are certain to crop up. So since they can’t have 1,000 monkeys tapping on 100 units until they’ve exhausted every possiblity, they use an emulator to simulate multiple fingertips; it looks pretty freaky having all these ghost touches working over their demo environment.


They also have a robotic arm named Petey. It’s kind of like a soft little jackhammer that has a bunch of preset tests that they can run to check whether a configuration is up to date — drag latency and that sort of thing. It was fun to watch in action, although to be honest I was kind of hoping for something more android-y, with fingertips and everything. I get the feeling the people involved really want to make this thing exactly like their vision and are willing to go to kind of ridiculous lengths to make sure it’s not going to crap out on some grandma and ruin her night.


The developer we talked to built this app that, using pretty simple coding and in just a couple minutes, would read the tag on the back of this physical picture, fetch the metadata from the flickr account it was from originally, and display it all side by side with the other tagged, categorized pictures that were in fact not physically real. Seriously people, this was like some science fiction tech here but it’s real and it actually works very well.


One of the last things they showed us were some research facilities where they test out the Surface on unsuspecting Microserfs. They record a ton of information from each testing session and it’s displayed thusly:
That was more or less the end of the ride. It’s hard to tell from the pictures (and even in video it’s hard to see just how dynamic these applications are and how well they work), but this technology is really impressive. I’m a little disappointed that it’s mainly going to be doing grunt work like hotel concierge stuff and parlor tricks until it really gets a big roll-out, but I firmly believe that once a few people get their hands on these things, they’re going to want them everywhere. I asked about seeing more of their little games and pet projects but we were out of time. They’re running down lots of possibilities, they said, but for now they actually need to put out a product so they can continue to make these things better and better. I’ll link you all to some video as soon as the other guys I was with get it live.
Monday, June 16, 2008
Scalable Zooming Tools
Microsoft has come out with Deep Zoom, a method that uses the Silverlight 2 plugin for navigating around large online images. Deep Zoom uses the same technique as that used in online maps and virtual globes — showing a hierarchy of ever-more detailed imagery tiles as you zoom in. Hard Rock Café has an early example of the technology in action.
And to prove the point about the similarity with maps, Deep Earth uses Microsoft’s own map tiles to create a Deep Zoom version of Virtual Earth. What’s the difference between the two? Virtual Earth doesn’t really zoom smoothly but does wrap around, Deep Zoom zooms but doesn’t wrap around (at least not in the examples given).
The London-based Center for Advanced Spatial Analysis (CASA) has had a similar tool for a while, except that this is a Java application that uses the Google Maps API: The Google Maps Image Cutter. It’s main advantage over Deep Zoom is that this application lets you make your own instances of zoomable gigapixel images. (I haven’t yet seen a tool that lets you create and publish your own Silverlight-powered gigapixel imagery.) [Update: There is a tool for creating Deep Zoom images, see comments.] The main disadvantage is that it doesn’t zoom smoothly — instead, you have to step between discrete zoom levels. And once you’ve zoomed smoothly, there isn’t really any going back.
It makes a lot of sense to publish gigapixel images to the web with a technology that only downloads the bits you’re actually zooming in on. (Zoomify is another example.) But what about 360-degree panorama images? These wrap around, just like an imagery dataset for a virtual globe. Here too, CASA has come to the rescue, with PhotoOverlay Creator, which produces KML that lets you explore a 360-degree panorama in Google Earth. This java app also uses a pyramidal hierarchy of tiles.
There are several ways of publishing panorama images on the web using Flash, such as Flash Panorama Player and Lucid. But such tools have lacked support for the piecemeal loading of high-resolution panoramas. One solution has been to become a member of and upload your panoramas to a site like Gigapan which uses server-side processing to deliver up the imagery piecemeal. But for DIY types, there is now also a relatively new Flash-based panorama publisher on the market that does provide multi-resolution tiling: KRPano. Expect to see a lot more development in this space.
So now we have scalable online viewers for both Euclidian and elliptic large imagery datasets. But where is the viewer for hyperbolic imagery? :-)
Thursday, June 12, 2008
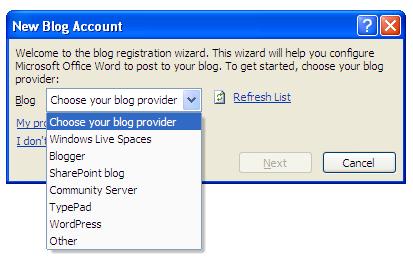
Create Blogs from MS Word - My first blog from MS Word 2007




Wednesday, June 11, 2008
Microsoft's Crazy Facts
Nobody can create a FOLDER anywhere on the computer which can be named as "CON".
This is something pretty cool...and unbelievable. ..
At Microsoft the whole Team, couldn't answer why this happened!
TRY IT NOW, IT WILL NOT CREATE "CON" FOLDER
This is something pretty cool and neat...and unbelievable. ..
At Microsoft the whole Team, including Bill Gates, couldn't answer why this happened!
Try it out yourself...
Open Microsoft Word and type
=rand (200, 99)
And then press ENTER
For those of you using Windows, do the following:
1. Open an empty notepad file
2. Type "Bush hid the facts" (without the quotes)
3. Save it as whatever you want.
4. Close it, and re-open it.
Is it just a really weird bug?
You can try the same thing above with another sentence "this app can break"
These special system variables are available irrespective of path
You cannot create a folder with these names also:
CON, NUL, COM1, COM2, COM3, LPT1, LPT2, LPT3,COM1 to COM9 and LPT1 to LPT9....
CON means console, COM1 means serial port 1, LPT1 means parallel port 1
Monday, June 02, 2008
Powerpoint 2007 - 5 wonderful tips
It’s been more than a year now, I have been using Powerpoint 2007 to create presentations, All thanks to my college faculties for giving us presentations to be presented every week. During this one year, I have learned a lot on how to use the features in PowerPoint 2007, and what all features are there not available in earlier versions. I have listed down these points which will be helpful to you if you ever intend to give presentation anywhere.

- SmartArt :- WOW, this is truly a Wow feature by Microsoft. SmartArt got great designs and shapes to be used. The good part is that you can change colors, give pre defined color combinations, which may suite your presentation theme and your topic. They also provide you designs for special purpose like Hierarchy, process, Chain reaction and few more… It completely eliminates the requirements for those drawing tool, used to draw those flow charts.
- Formatting Images :- Basic formatting did exist in earlier versions, but was not very interactive. The new version is much better and provides some more better and required features. Changes made to the images can be seen live, as soon as you make any changes, you do not need to apply those changes to see the effect of it. Another feature provided is to disable the image compression which in turn increases the size of presentation but also the quality remains intact. To disable image compression Go to Image options (Appears when you insert and select an image) –> Compress images –> Options, and untick “Automatically perform Basic compression on save“. From there you can also set the density of the image as per the requirements. The only problem which I came to know later on was that you need to do this again and again, for different images, as it is not a permanent change.
- Page Setup :- It is not possible to give a presentation in a single style on all the Projectors. According to the device you are presenting on, you need to change the page setup, hence getting the most of it. We cannot present the same presentation on Plasma and on a projector, as both have different aspect ratios. To select the proper page setup, Go to View tab –> Slide Master –>Page Setup. From here choose the correct setup you want to. You can have customized sizes as well.
- Custom shows :- We are used to give long presentations in short duration, and leave the deep understanding part. You have to insert that data so that everyone could read that. One way is to put notes in each and every single slide, But in notes to, everything cannot be expressed. The other way is to create a complete slide and present a Custom show. How ? Just Go to Slide show tab –> Custom Slide, and choose the slides you want to show. Simple enough.
- Rehearse Timings :- Timings are very important for us. If we go beyond those time limits, we are bound to get reduced marks. This rehearsal tool comes in handy, where in you can practice and see if your speech matches with the presentation and time allotted. You can also set the time for slides to switch automatically when you have rehearsed, and save that rehearsal. This is one of my favorite tools which I think was needed but the there was no alternative to that.

Saturday, May 31, 2008
Windows 7 - Sneak Peek..

So Microsoft’s Sinofsky had a pretty good dance with CNET about Windows 7, really not saying much of anything. But a picture’s worth a thousand words, right? Howzabout a ton of pics?
We can confirm these are indeed screen shots of the current build of Windows 7 as it will be introduced in 2010, but keep in mind that’s three years away and many changes might be made. We’re hoping it’s better than Vista.
Click the jump for lots of screen grab goodness.
[UPDATE] A Microsoft rep has pointed out that these are older versions of the concept renderings for Windows 7 and, as stated above, not likely what we’ll see when it’s released in 2010. In other Windows 7 UI news, the latest version will be demoed later tonight at the All Things D conference. It’ll be interesting to see how close to these older renderings it turns out to be.


via Crunch Gear

 Posts
Posts


