

Today we all have our blogs; but four to five years ago this concept was not popular. But now blogs have their own importance for personal and business purposes. ‘Blog’ is a short term for ‘web log’. It is a website that is like a diary or a log where you can write your thoughts, events, actions, anything and everything you want. There are millions of blogs on the internet today. Some blogs are personal which a log of a person’s activities or thoughts. But some blogs are also used as a business tool for communicating and sharing knowledge to a group of people with same interest or career. Blogs are open to public to view and share their thoughts. There are different providers that offer services to create and maintain a blog on their servers. Microsoft Word 2007 provides a new feature of creating blogs in Word.
Starting a new blog post
Creating a blog is similar as creating a new document. Follow the following steps for creating a new blog post.
1. Launch Word 2007 and click on the Office button.
2. Select New to open the ‘New document’ window.
3. Choose ‘New Blog post’ in the window.

4. The New Blog Account window appears. This is the first step of the blog registration wizard.

Here you can choose to register immediately and then write a post or you can always choose to ‘Register Later’ and proceed with writing the blog post first.
5. If you choose to ‘Register Now’ you would be taken to the New Blog Account window.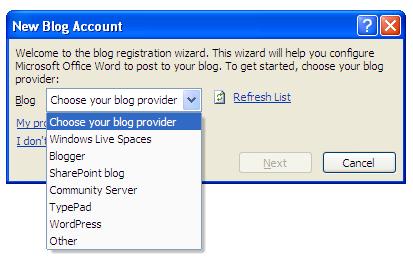
If you already have a blog account with any of the providers like Windows Live Spaces, Blogger, SharePoint blog, or any other then choose the same from the drop down list and enter the login information and proceed with the wizard.
6. 6. When you finish with the wizard or if you click on register later, you would be returned to the Blog Post Window, which looks similar to the ‘New document window’. See figure below:

The ribbon (menu bar in the new interface) in the New Blog Post window features only two tabs – Blog Post and Insert.
The Blog Post tab consists of all the commands and tools related to creating post, editing the text, clipboard, styles and proofing.

On the other hand the Insert tab lets you add table, pictures, links, etc to your blog.

Entering the post
The default format for the New blog post asks you to enter a post title to begin with the blog.

Enter the post title and begin typing below the line. You can use different text options and styles to stylize your text as per you choice.
Categorizing your blog
Word 2007 also lets you categorize your blog so that the search engines could locate your blog and readers would find your blog while searching for a specific category. To insert a category to your blog, choose Insert Category option from the Blog Post tab on the ribbon. You can explore the list of existing category from the given list or create a new one.
Adding hyperlinks to your blog
A blog can have hyperlinks to link from and to your posts. You can choose a portion of text in your blog and then go to the Insert tab on the ribbon, click on Insert Hyperlink and in the address box provide the URL which you want to link. This text would now appear in blur color with an underline, indicating that it is a hypertext. Anyone who clicks on this link would now traverse to the URL you have provided.
Adding pictures to your blog
Make your post interesting by adding pictures to it. To add pictures go to the Insert tab on the ribbon, choose Picture button from the Illustrations group and browse to the path of the picture, and click on Insert. Once you insert a picture, the ribbon is populated with the Picture tools.

With the help of these tools you can edit the image, add any special effects, arrange the position and resize it.
When you are done with your blog post, the last step is to publish it. Click on the Office button, choose Publish and Blog.

If you have already registered then your blog post would be posted, else the Register a Blog Account dialog box would be prompted. Follow the steps of the wizard to post you blog.
Conclusion
I hope this article was informative and has given you an insight to the blogging feature in Word 2007.

